Large pics enclosed. Allow time to load.
Disclaimer: Im no painter.
1. First the obvious. Make sure the surface you want to paint is clear of oil, dirt, rust, etc. But youre an intelligent guy/gal, I dont need to tell you that.
2. If you do not plan to strip the old paint off, make sure that you scuff it up real good. Sand down any chip holes so that the edges are smooth. If you do want to strip the old paint, there are many ways to do this. The fastest and easiest way is sand blasting. For gas tanks, it is best to use silacosand or glass beads. Sand causes sparks when you get down to the metal. I dont think I have to explain that sparks and gas fumes are a bad combination. You can also use paint stripper. I dont like it. Too messy. But the best Ive found to use is called Airplane stripper. Wicked stuff. Your third choice, and this is what I done, is to use a heat gun and a scrapper. Dont use your ol ladies hair dryer. It wont be hot enough. When you are done scrapping, sand down any left over paint, and scuff up the metal. Again, make sure you are free of dirt and oil. You can use paint thinner to clean.
3. Primer. Use lots of sandable primer. If you are using any filler, work on these spots first. After you have your bondo nice and smooth, spray some primer over it and let it dry. Ha! You thought it was smooth, didnt you? Now, sand it lightly with the primer dry, then go back and add more bondo if needed. Sand and spray again. Once that is done, primer the whole piece now. Apply the primer evenly. Go in one direction, holding the can about six inches away. Let dry, then repeat. I use a whole can, depending on the size of the pieces. If you get any drips, dont worry, you can sand them down when the primer is dry.
4. Your choice of paint really makes all the difference in the world. I like to use Dupli-color Truck and van paint. (About $5.00 or $6.00 bucks a can.) It goes on a lot thicker, and is closer to the consistency of shop paint, and hardens better than your cheaper brands. Although, Rust-oleum makes a nice metal flake paint for about the same price.
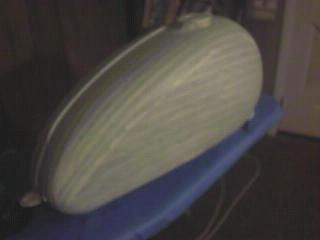
5. Place the pieces to be painted in good open area where you can move around them. Make sure you have lots of light to see what you are doing. When hanging something, hang it about shoulder level, or a little lower. I dont really like hanging stuff because it has the tendency to move around on you. But with fenders, its the best way. For my Sportster tank, and my Triumph tank, I set it up on a saw horse. If you do this, make sure you hit the bottom. If your doing Fatbob tanks, I suppose you could place them across two saw horses. Just make sure you hit the backs later.
6. Now you are ready to paint. One can of Dupli-color, should be enough. Like I said, it goes on real thick, and covers real nice. But you can use more if you choose to. Dupli-color come with a fan spray tip. It is important to keep this clean, by wiping it often as you paint. Otherwise, it starts to build up, and comes gooping out. Between coats, clear your tip by turning the can upside down and press until paint stops coming out. Also, it is a good idea to remove the tip and let it soak in paint thinner.
7. Now, apply your paint in the same manner in which you applied your primer, staying at least four to six inches away, and taking nice even strokes in the same direction. Make sure you keep your hand on a level plane, making sure you are not moving your hand in an arching motion. If you get a drip, do not wipe it. Let it dry, and lightly sand before you next coat. Spray paint drys quickly, so you can wait an hour or two between coats, but the longer, the better. Apply at least three good coats, before you start wet sanding out the orange peel. After you sand, dry your piece with a soft towel before you apply the next coat. When you are done painting, let dry over night, they apply clear topcoat, also by Dupli-color. One to three coats is all you need. Too much clear has a tendency to crack or spiderweb. If you plan to paint flames or some other designs, hold off on the topcoat until you have everything the way you want it.
8. When applying a stenciled in design such as flames, be very sure that your base coat is completely dry. Wait two days if you have any doubts, before you begin.
9. Use masking tape to cover your piece. Try to follow the contour as much as possible. Try to avoid too much overlapping, or any kinking of the tape.
10. Once you have your tape on smoothly, You can begin to draw out your design.
11. When cutting out your design, it is very, very, very, important to use a sharp blade. A fresh X-acto knife is perfect. DO NOT PRESS HARD WHEN CUTTING! This is very important because you will mess up your undercoat. Press just hard enough to cut the tape, but avoid breaking the serface of the paint. This is why it is so important to use a sharp blade. You will get some scratches, but they can be sanded out if not too deep. Try to follow your lines as best as possible, and avoid tearing your tape.
12. After you have cut your design, check and make sure you have not missed a cut, to avoid tearing when you peel the tape off. When you are ready to peel off the tape, be sure you know for certain which side of the cut you want to remove. (This is where it is important to use good paint. Cheaper paints can stick to your tape when peeling, really pissing you off.) Once you have removed the tape, you may find little burs. Those can be tucked in or cut off with your blade. Again, be sure to try and avoid breaking the surface of the paint as much as possible.
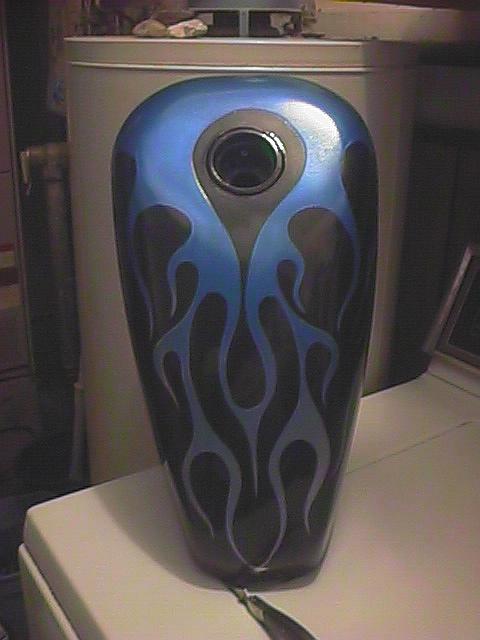
13. When fadeing your flames from one color to another try this. Lets say you want blue that fades into silver, like my tank. Start at the front of the tank where you want the blue. Go up just past the point where you want it to start turning silver. Remember, if you are using fan tip sprays, to keep them CLEAN. Now start you sliver paint where the blue left off. Stay further away then usual at first, then closer as you get toward the end of your flame. Now go back to the blue. Start close and then fade back as you reach you secondary color. Repeat. Work it, youll get the hang of it. Make your flames thick. You dont want to end up sanding them off in the final process. Once you have achieved your desired fade, let you flames dry about 24 hours.
14. Now remove the remainder of the tape. You will notice there are ridges around the edge of your flames. Thats normal. Now take 400 to 600 grit wet sandpaper, and gently sand. Keep it wet. Once you have removed a good deal of the ridge to and almost smooth, finish off with 800 to 1,000 grit wet sandpaper. Remember, GENTLEY. Just enough pressure to remove the ridges and orange peel. It is normal to see the silver paint starting come through the blue (if those are your colors) as you are sanding. You can use this also as a blending technique. Work it. Once you have it where you want it, dry with a soft cloth. Once it is dry, GENTLY rub with rubbing compound. Follow the rubbing compound directions on the side of the container. I rubbed out my base coat first, going in between the flames, because I found that when I done it all at once, black was starting to stain my flames, then I done my flames.
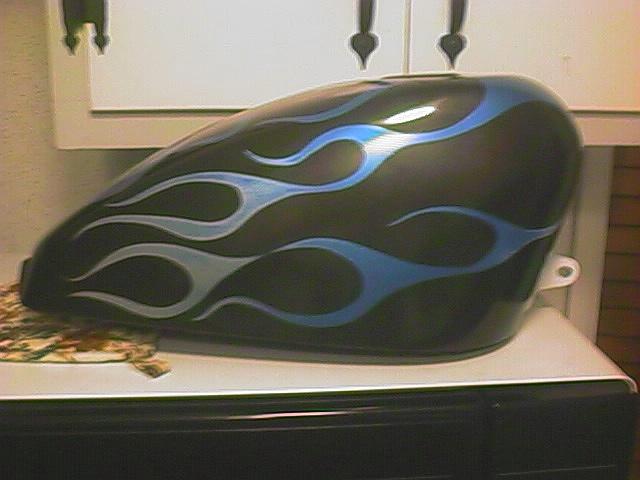
This photo shows where I did not sand down the ridge of the flame, and there is a slight trace of orange peel around the fuel opening. The rest of the tank is very smooth, and looks a lot better than this picture.
15. Now, apply your topcoat
16. Stand back and admire your work thinking, Damn, Im good.
Extra points to remember:
Find the cleanest place possible to do your paint job. Be as anal as you want, it can never be too clean. You will find in the process of applying coats of paint, that dust will seem to magically appear on your coated surface. Unless you have a spray booth, there is nothing you can do about it except sand it out. Dont fret over it. Try to sweep your work area before you begin. This will help keep some of the dust down that you might kick up as you walk around
Take your time. A rushed paint job is a shitty paint job. Following my above instructions, it should only take you just a few days to complete.
Hope this helps,
Have fun.
-Bugs